Changing edit modes
We have already learned a bit about the Grab mode (select/move objects) and Range mode. In this chapter we will get an overview of all the edit modes and cursor modes available on that part of the Editor window.

Edit Modes
These controls define the behavior of the main canvas and the different functions of the cursor.
The drop-down Edit mode menu contains three options:
- Slide mode
- This is the standard mode. It allows you to freely drag regions around horizontally (within the same track) and vertically (between tracks).
- Ripple mode
- Automatically moves regions when you cut or shift one of the regions. E.g. if you cut a portion of an audio interview that isn’t interesting, Ardour will shift all regions in all tracks to the left so that there would be no silence where content used to be.
- Lock mode
- However you edit a region with this mode on, the content of the region will always be where it is. You can only move the region up or down between tracks, but not left or right.
We will only use the Slide edit mode in this tutorial.
Edit point
The edit point defines where various editing operations happen. When using cutting/splitting as an example…
- Playhead
- Regions will be split at the playhead position.
- Marker
- Regions will be split at the last marker that is within the range of the selected region.
- Mouse
- The selected region will be split exactly under the mouse pointer.
Cursor modes
Grab mode

This cursor mode (G shortcut) allows you to select or move objects such as regions and breakpoints (in an automation curve). When this cursor mode is selected, your cursor pointer will look like a little hand icon.
Range mode

This cursor mode (R shortcut) allows you to click and drag to define or resize time ranges. When this cursor mode is selected, your cursor pointer will look like a vertical line. Time ranges can be selected over one or several tracks, depending on the selection of your tracks.
Smart mode

When this mode is enabled, depending on where exactly above the region the mouse pointer is, Ardour will provide either grabbing functions (e.g. grabbing and relocating a region) or range functions (selecting a range).
Cut mode

Use this cursor mode (C shortcut) to split regions into smaller regions. The cursor turns into the shape of scissors. This allows you to point and click on a region to split it at the cursor.
You can cut regions directly from the Grab mode too (sometimes this method can be more practical.) Without leaving the Grab mode, simply place the mouse at the desired location on the region to be cut, and hit the S shortcut (for “split”). Important: your edit point (to the left of the Modes toolbar) must be set to Mouse.
Stretch/Shrink region

This cursor mode (T shortcut) allows you to drag and resize the duration of an entire region without changing the pitch. This is sometimes called “time stretching’, hence the T shortcut. Please see the chapter on Stretching/Shrinking Regions for more details. When this cursor mode is selected, your cursor pointer will look like a diagonal arrow.
Grid mode

This mode (Y shortcut) allows editing the tempo map to accomodate for tempo fluctuations of a live session recorded as an audio track. This will make the audio track the reference, MIDI regions built based on this tempo map will sync to original audio perfectly.
Clicking above a bar line inserts a new tempo marker, and dragging left and right immediately after that increases/decreases the tempo value.
Clicking and dragging between bar lines left or right creates a tempo ramp — a gradual change in tempo between two tempo markers.
Draw mode

This mode (D shortcut) has 4 use cases:
- Drawing new automation points (automation will be discussed in detail in the Using Automation chapter).
- Drawing new MIDI regions.
- Drawing new MIDI notes in MIDI regions.
- Editing existing MIDI notes and automation points when a region is sufficiently zoomed in.
If you haven’t zoomed in enough, it’s easy to create either a new MIDI note or a new automation point you did not need. If this becomes a problem, you should use the next mode which only allows for editing existing points and notes, not creating new ones.
For drawing MIDI notes, the toolbar additionally has controls for default note length, MIDI channel, and velocity.
Internal edit mode

Use this mode (E shortcut) to edit existing automation points or MIDI notes.
For automation points, the cursor looks like a hand and turns into a small cross when you are on top of an existing point. Click, hold, and drag in order to move points.
For MIDI notes, the cursor looks like a hand with a quarter note above it when you hover the middle of note, that’s for selecting a note and moving it around. Hovering either the left or the right border of a note will change the cursor and allow adjusting start/end position (and thus duration) of a note.
For both automation points and MIDI notes, you can press Ctrl and click on multiple items to add them to a selection of items, then move multiple notes or points altogether.

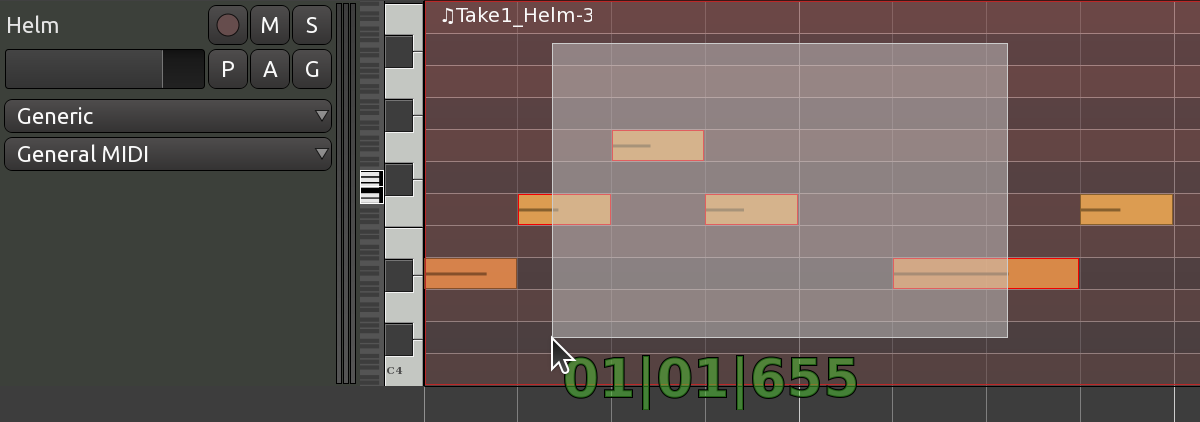
For MIDI notes specifically, you can also use rubberband selection: place the cursor anywhere outside existing notes (the cursor will lose the quarter note symbol), then press left mouse button and start dragging. A selection frame will appear. All notes it touches will be selected.

Continuing
In the following chapter, we will see how to take the regions we have edited and create looped sections from them.
Next: CREATING LOOPED SECTIONS